- Install The Plugin
- Activate Your License
- Content Filtering
- Archive Messaging
- Delete Messages
- Exporting Messages
Introduction
Getting Started
View our helpful video tutorials on a variety of CF7Bank topics.
Let's Begin
Access the CF7Bank plugin from your account area. Navigate to app.pluginbank.io and login using your username and password. Once logged in, you will see your Dashboard area. Look to the bottom of the interface to locate your product purchases. Locate the "Plugin File" link and download the file.

Important Note
Note your license key. You will need this to activate your plugin after it has been installed
Configuration
Install The Plugin
Install the CF7Bank plugin on your WordPress website. Log into your WordPress Admin and navigate to the "Plugins" option in the WordPress side menu. At the top of the screen, locate the "Add New Plugin" button and press it. From the Add Plugins screen that appears, press the "Upload Plugin" button. You will now see the screen below prompting you to locate the plugin file. Press the "Choose File" button and select the .zip file you downloaded in the previous step:

Activate Your License
To begin using your plugin, please activate it:
Option 1
Visit the CF7Bank plugin by either navigating to the "Plugins" section in the Wordpress admin menu and clicking on the "Settings" options as shown below:

Option 2
Or hover over the "Contact" option in the WordPress admin menu to access the sub-menu. In the submenu - select the CF7Bank option.

Important Note
Because CF7Bank manages your Contact Form 7 submissions, it can always be accessed from the WordPress Admin menu item "Contact" submenu.
Locate The Settings Button
From the plugin view, use the "Settings" button located in the upper right portion of the screen. See below:

Paste in your License Key in the field shown below and press the blue "Update/Save Key" button:
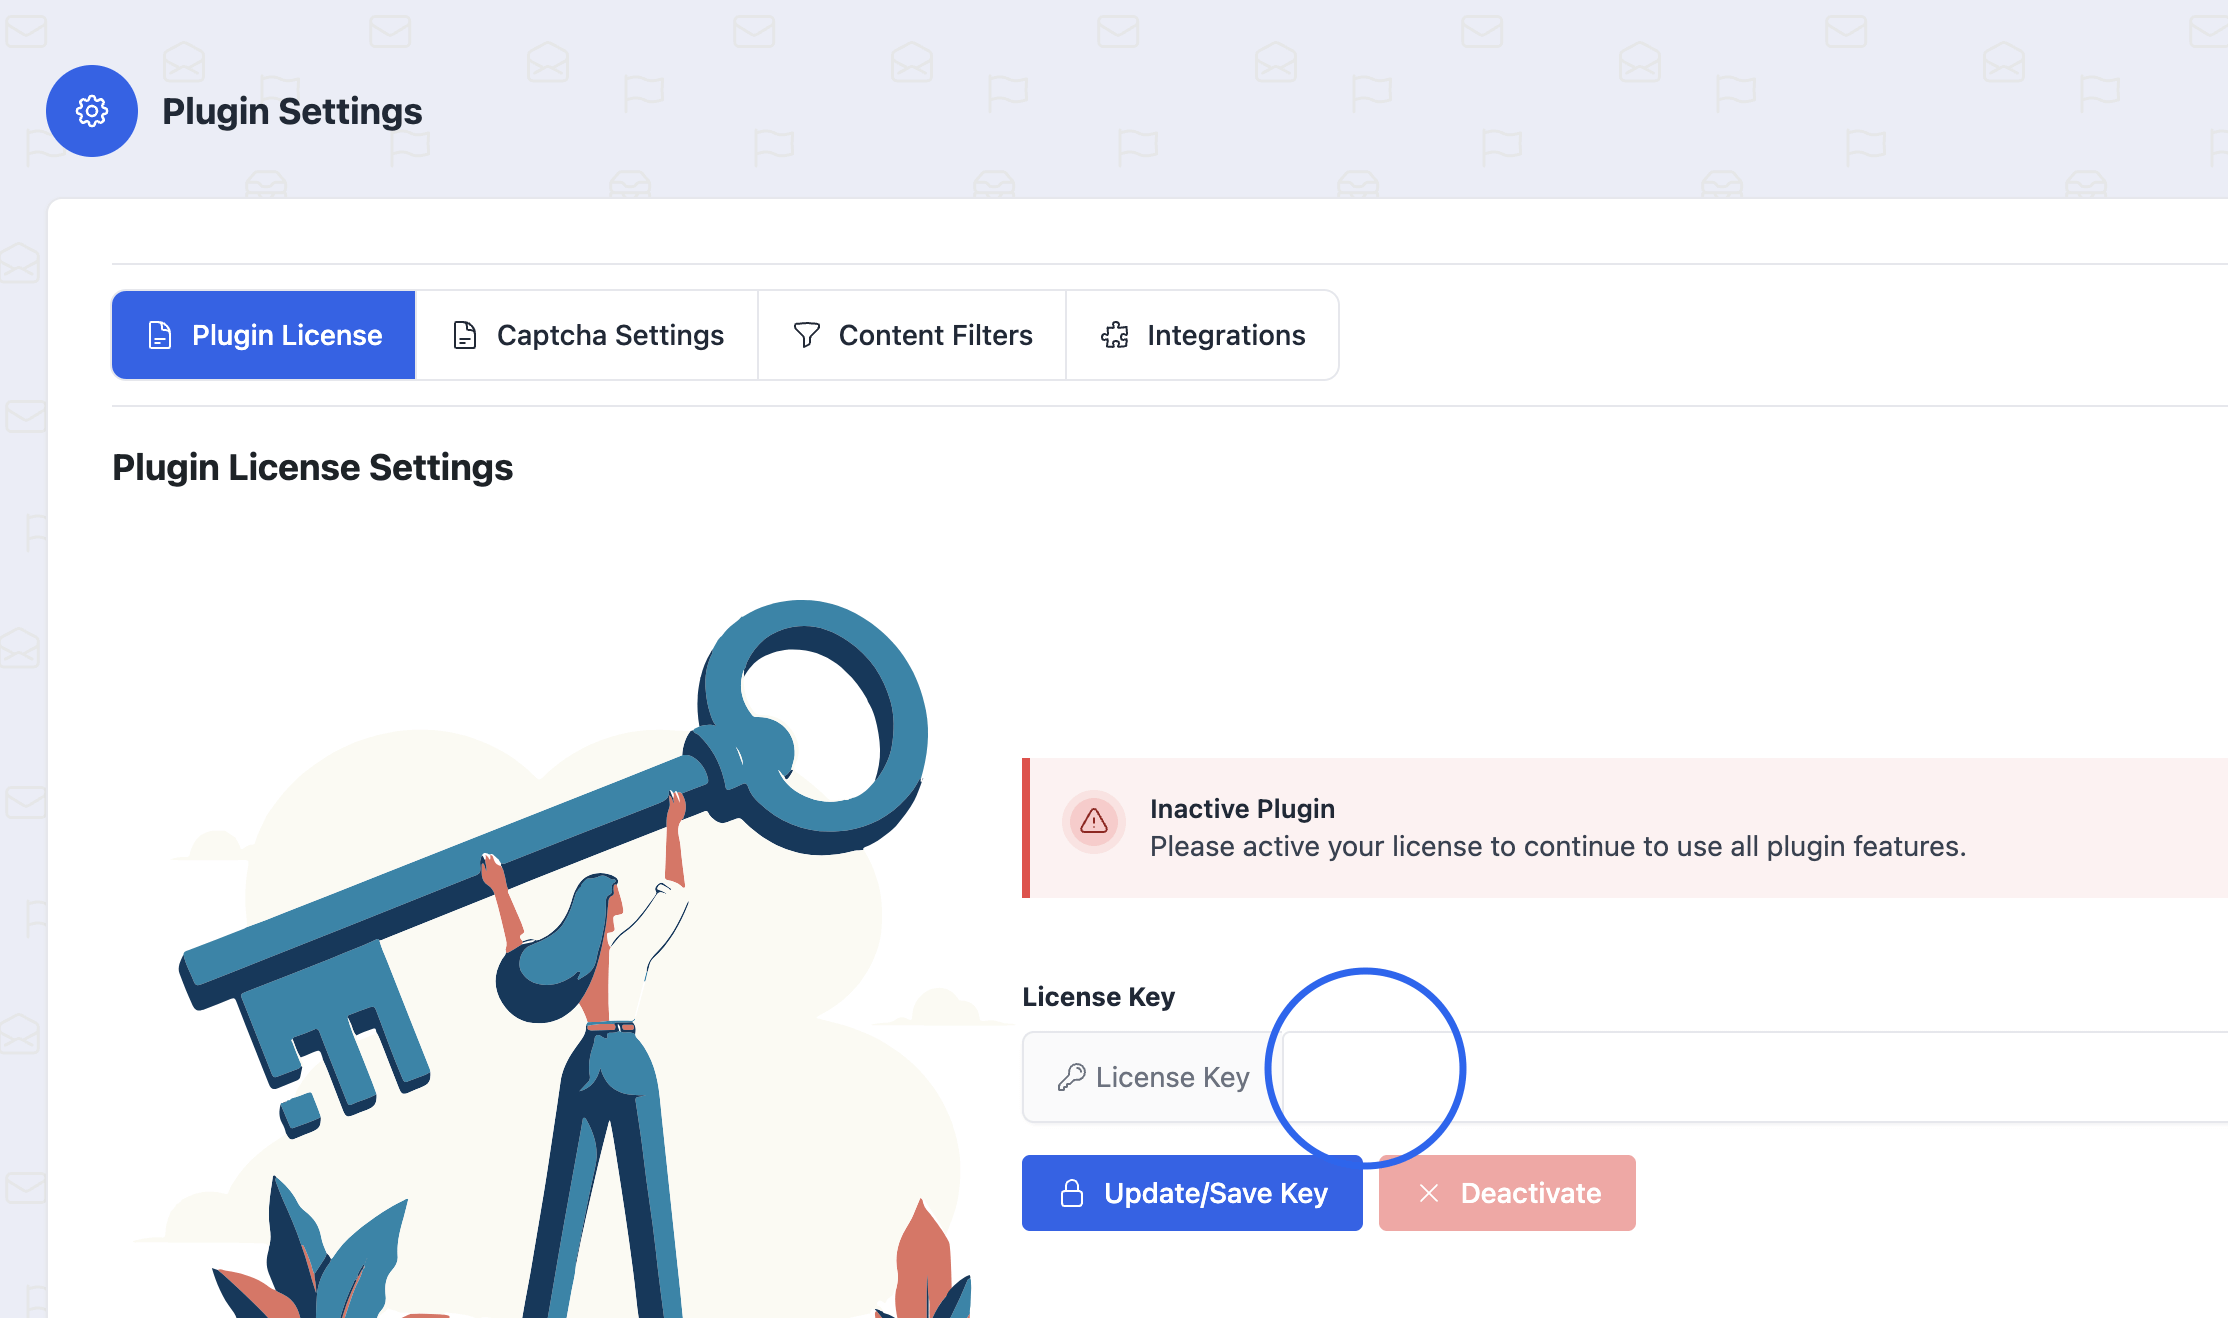
Note:You find your License Key in your dashboard on app.pluginbank.io in the same area you downloaded your plugin in the first step of this documentaion.
Content Filtering
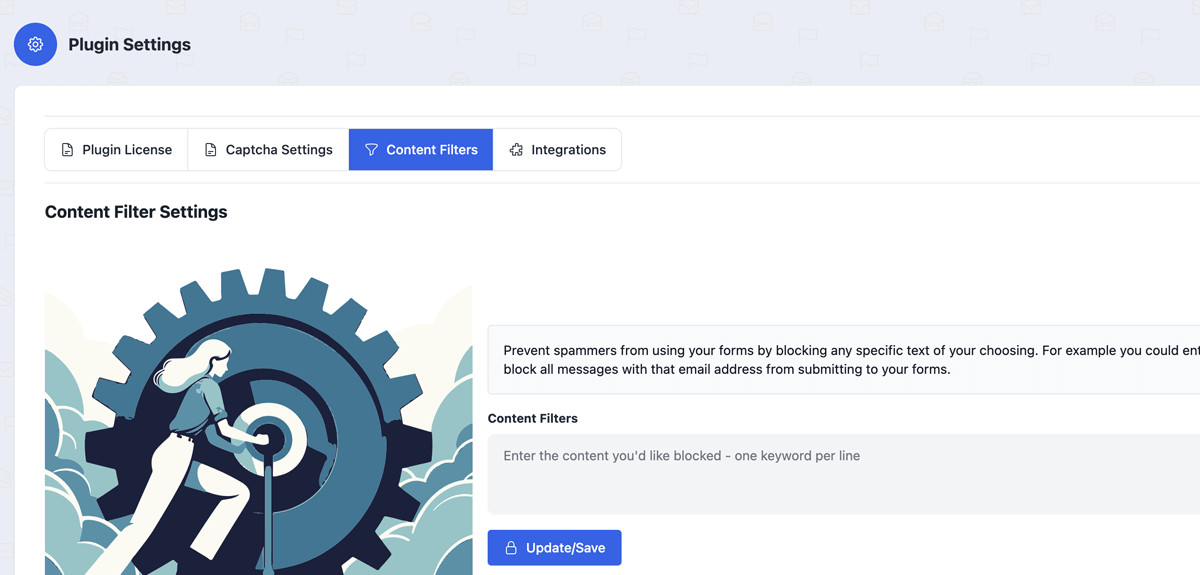
Cf7Bank has a content filter option that allows you to enter any keywords or domain names that you wish to filter out of your form submissions. Navigate to the "Settings" section of the plugin, and click the tab titled "Content Filters".
On the Content Filter screen, locate the textarea and enter whatever words or terms that you want to filter out of your submissions. You can include domain names in this space or simply keywords that you want to block to prevent spam. Once you've entered your keywords press the blue "Update Save" button.
Archive Messaging
Records/submissions moved to the archive can be considered soft deleted. These records are moved to a separate area of the plugin, removing them from the main submissions index. Note only records that have been moved into the Archive can be permanently deleted.
To delete archived messages, click on the Status checkbox at the top of the Archive index. This will allow you to select multiple messages for deletion. Alternatively, on a per-record basis, you can also delete a record by viewing it inside the archive. Once the record loads, use the "delete" button located in the "Record Actions" module. Please note: once deleted, you cannot recover a deleted message..
If a record has been accidentally moved to archive status, or you simply wish to re-include it in the main submission index, you may press the button "Remove From Archive" button located under the "Record Actions" module. This will move the record back into the main submission index.

Send a message to the archives by viewing it and choosing "Archive" from the actions panel

View all of your archived messages by choosing "Archive" from the plugin main view.
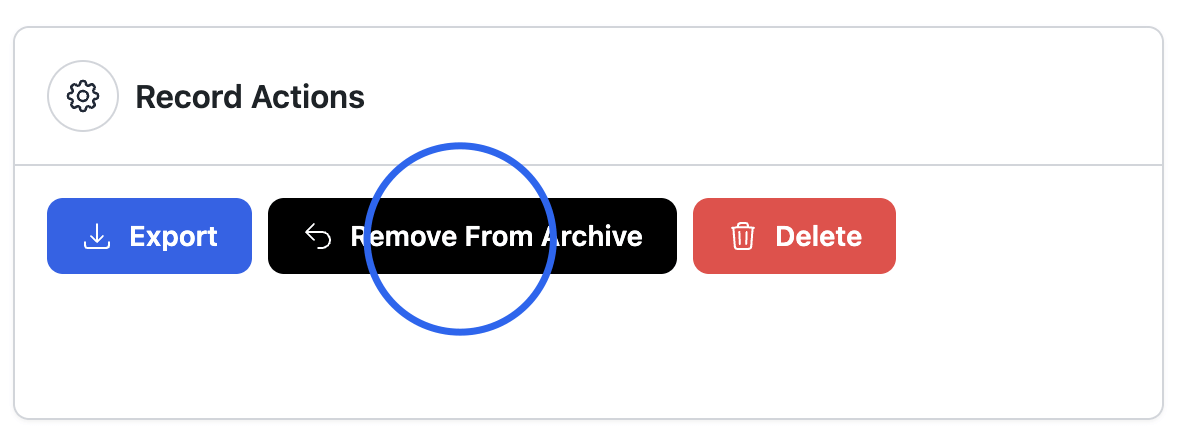
Remove from archive button will put the message back in the main message list and un-archive it.
Delete Messages
Important Note
Once a message is deleted from CF7Bank it cannot be recovered.
We recommend you archive messages to remove them from the main message list. Otherwise, please know that deleting a message means it will be removed forever from your website and cannot be recovered.
Exporting Messages
Messages can be exported in bulk from the main submission list view, or on an individual basis.
Option 1
From the main message list view, click the checkbox next to the table heading titled "Status," see below:

Once the checkbox is active, you will see a list of actions that can be taken on all messages. To export all of them, press the export option and all of your submissions will download in CSV format.

Option 2
When viewing an indvidual message, in the actions section - press the export button to download the submission to CSV:

Integrations
Understanding Integrations
CF7Bank integrates with both the Klaviyo and OmniSend CRM platforms. To create an integration navigate to the settings section of the CF7Bank plugin.

Choose the tab titled "Integrations" as indicated below:

Watch the video on accessing integrations
Klaviyo Integration
Choose blue button beneath the Klaviyo logo titled "Manage This Integration." On the next screen choose the “Add New” button on the right side of the view.

Step 1
Step 1 is to include your API Key from Klaviyo. Once you’ve pasted in your API Key, press the “Save Connection” button to proceed. If you need help accessing your Klaviyo API Key, please watch our video below:

Watch the video on how to access Klaviyo API Keys
Step 2
Step 2, please create a name for this integration. Note: because you can have multiple integrations with CF7 Bank - the name you enter here will help you identify and organize the integrations you create.
Next, choose one of your Contact Form 7 forms from the drop down-menu. The drop-down menu will list all of your existing website forms, so choose the form you want to integrate with Klaviyo. Now click the “Save slash Proceed” button to continue.

Step 3
Step 3 involves mapping the form fields from your chosen Contact Form 7 form, with the fields returned from the Klaviyo API. However, before we map any form fields - we have to choose which list from Klaviyo we want our form data to submit to. Make a selection from the drop-down list titled "Choose The List." You will see all available Klaviyo lists returned via your API Key. Once you've chosen a list, you can proceed. The left column lists all of the form elements in your Contact Form 7 Form. The right column includes drop-down menus listing all available fields from Klaviyo. Use the drop-down menus on the right column to select the Klaviyo field that best matches each input from your website form. For example, in our form - “First Name” from Klaviyo will match with “your name” from our website form and “Email” from Klaviyo will match with “your email” on our website form. Continue to map all of the fields on your form with the fields you want to map or send to Klaviyo. Any fields you choose not to map, will not be sent to Klaviyo.
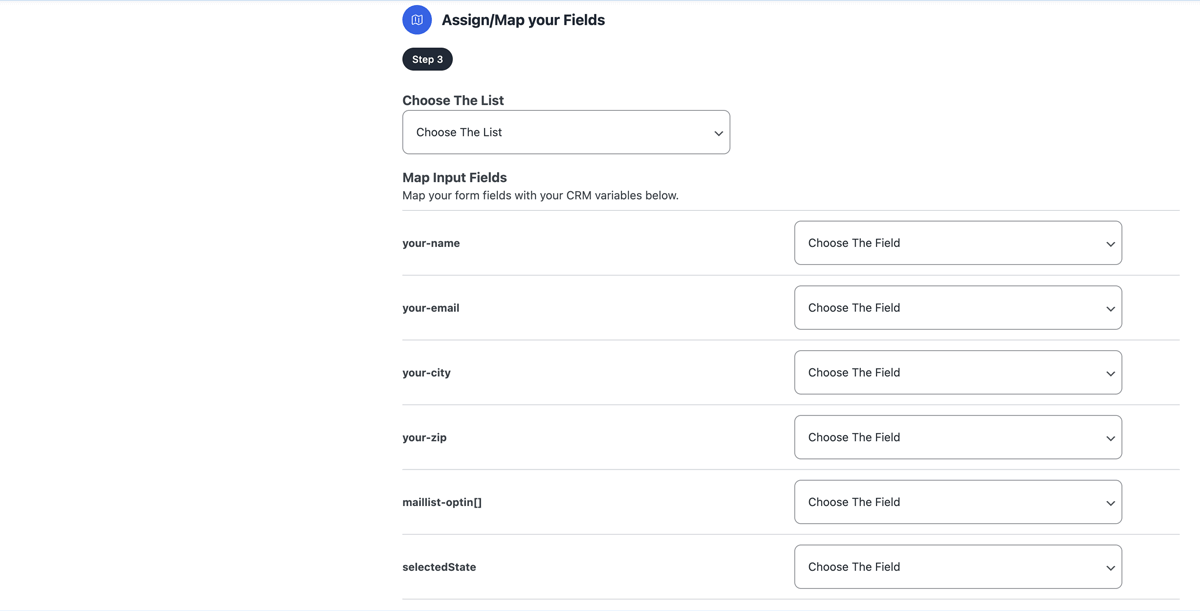
At this stage, depending on the needs of your form - you may be complete. Simply scroll down below the "Conditional Logic" heading, and click "Save slash Proceed." Your integration is now active and complete.
However, if you wish to include any conditions that need to be met before submitting your form data to Klaviyo, you will need to use "Conditional Logic."

For most common applications - conditional logic is how you can include Opt-In checkboxes to your website form. Let’s say your form has a "Subscribe To Our Mailing List" checkbox, and users need to check it, in order to opt-in to your Klaviyo List. Here's how we can accomplish this:
Press the button labeled "Add Conditionals." This will inform the plugin that you are creating a "condition" for this integration. Now, locate the "Add" button that has just appeared, and press it. This creates a new condition. In the first drop-down menu titled "Choose a field," select the form element that you want to create a condition for. In our example, we are choosing a checkbox element from our Contact Form 7 form. The checkbox has been named "mail list opt-in." Now that we have the form element we are creating a condition for - we need to select the condition to either "equal" or "not equal." Do this by choosing an answer in the second drop-down menu titled "Set Condition." Lastly, in the third input, which is currently blank, we need to name the value of our checkbox. This value is defined in Contact Form 7. In our example, the value of this checkbox is "Please Join Our Mailing List." To review, we have selected the checkbox from our form that we want to match against, we have set it to be "equal to" and we have defined the value of the checkbox. This tells the integration that if a user has checked the checkbox, and the value of the checkbox is equal to "Please Join Our Mailing List," the form data will be submitted to Klaviyo.
The final component of our "Conditional Logic" is the conditional criteria. We need to determine if our condition matches all of our criteria, or simply any of the criteria. In our current example either selection will work, and this is because we only have ONE condition defined. However, if we have multiple conditions - we might require our form to post to Klaviyo only if ALL conditions are met. This is ideal if your form requires multiple checkboxes to be checked, before submitting to the CRM.
And that's it. Once you've configured your conditions, just press the Save/Proceed button at the bottom of the view. You have successfully added your Klaviyo integration.
Watch the video on how to Integrate Klaviyo
OmniSend Integration
Navigate to the settings area of the plugin.

Choose the tab titled "Integrations"

Watch the video on how to access Integrations in CF7Bank
Create A OmniSend Integration
Choose blue button beneath the Omni logo titled "Manage This Integration." On the next screen choose the “Add New” button on the right side of the view.
Step 1
Step 1 is to include your API Key from OmniSend. Once you’ve pasted in your API Key, press the “Save Connection” button to proceed.

Watch the video on how to access API keys in OmniSend
Step 2
Step 2, please create a name for this integration. Note: because you can have multiple integrations with CF7 Bank - the name you enter here will help you identify and organize the integrations you create.
Next, choose one of your Contact Form 7 forms from the drop down-menu. The drop-down menu will list all of your existing website forms, so choose the form you want to integrate with OmniSend.
Now click the “Save slash Proceed” button to continue.

Step 3
Step 3 involves mapping the form fields from your chosen Contact Form 7 form, with the fields returned from the OmniSend API. The left column lists all of the form elements in your Contact Form 7 Form. The right column includes drop-down menus listing all available fields from OmniSend. Use the drop-down menus on the right column to select the OmniSend field that best matches each input from your website form. For example, in our form - “First Name” from OmniSend will match with “your name” from our website form and “Email” from OmniSend will match with “your email” on our website form. Continue to map all of the fields on your form with the fields you want to map or send to OmniSend. Any fields you choose not to map, will not be sent to OmniSend.
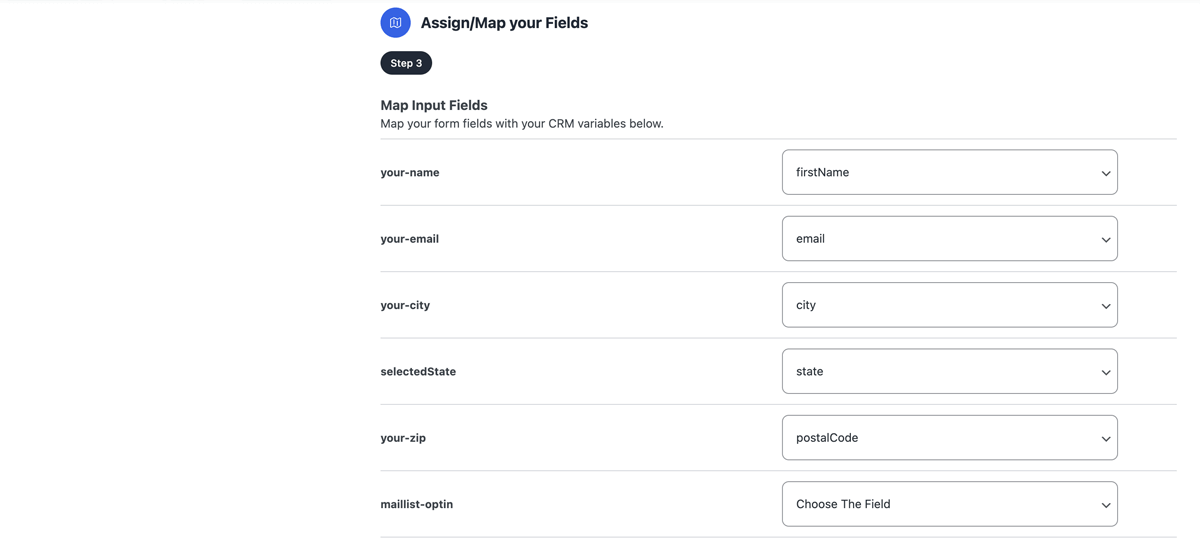
At this stage, depending on the needs of your form - you may be complete. Simply scroll down below the "Conditional Logic" heading, and click "Save and Proceed." Your integration is now active and complete.
However, if you wish to include any conditions that need to be met before submitting your form data to OmniSend, you will need to use "Conditional Logic."
Conditional Logic
For most common applications - conditional logic is how you can include Opt-In checkboxes to your website form. Let’s say your form has a "Subscribe To Our Mailing List" checkbox, and users need to check it, in order to opt-in to your OmniSend. Here's how we can accomplish this:
Press the button labeled "Add Conditionals." This will inform the plugin that you are creating a "condition" for this integration. Now, locate the "Add" button that has just appeared, and press it. This creates a new condition. In the first drop-down menu titled "Choose a field," select the form element that you want to create a condition for. In our example, we are choosing a checkbox element from our Contact Form 7 form. The checkbox has been named "mail list opt-in." Now that we have the form element we are creating a condition for - we need to select the condition to either "equal" or "not equal." Do this by choosing an answer in the second drop-down menu titled "Set Condition." Lastly, in the third input, which is currently blank, we need to name the value of our checkbox. This value is defined in Contact Form 7. In our example, the value of this checkbox is "Please Join Our Mailing List." To review, we have selected the checkbox from our form that we want to match against, we have set it to be "equal to" and we have defined the value of the checkbox. This tells the integration that if a user has checked the checkbox, and the value of the checkbox is equal to "Please Join Our Mailing List," the form data will be submitted to OmniSend.
The final component of our "Conditional Logic" is the conditional criteria. We need to determine if our condition matches all of our criteria, or simply any of the criteria. In our current example either selection will work, and this is because we only have ONE condition defined. However, if we have multiple conditions - we might require our form to post to OmniSend only if ALL conditions are met. This is ideal if your form requires multiple checkboxes to be checked, before submitting to the CRM.
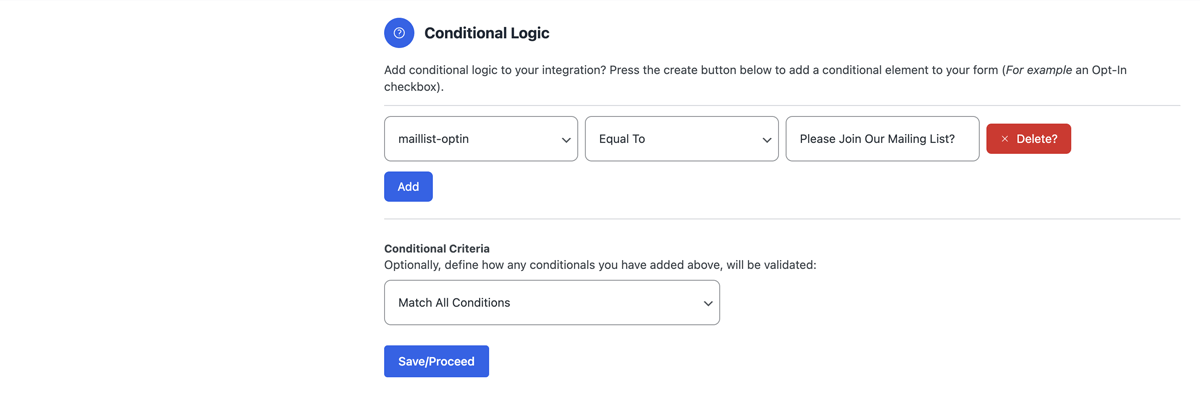
And that's it. Once you've configured your conditions, just press the Save/Proceed button at the bottom of the view. You have successfully added your OmniSend integration.